
| 일 | 월 | 화 | 수 | 목 | 금 | 토 |
|---|---|---|---|---|---|---|
| 1 | 2 | 3 | 4 | |||
| 5 | 6 | 7 | 8 | 9 | 10 | 11 |
| 12 | 13 | 14 | 15 | 16 | 17 | 18 |
| 19 | 20 | 21 | 22 | 23 | 24 | 25 |
| 26 | 27 | 28 | 29 | 30 |
- 깃허브오류
- 부트캠프 #CSS #개발일지 #TIL #박스모델
- 개발일지 #TIL #프론트엔드 #HTML
- 부트캠프 #개발일지 #TIL #Position #위치
- JS예제
- js
- 부트캠프 #개발일지 #TIL #그리드 #CSS
- useState
- useEffect
- querySelector
- 템플릿스트링
- 리액트
- 결합선택자
- 알고리즘
- 부트캠프 #스파르타코딩클럽 #개발일지# #TIL #Javascript #confirm #location.href
- 부트캠프 #스파르타코딩클럽 #개발일지# #html
- appendChild
- 특성선택자
- 개발일지
- 부트캠프 #CSS #개발일지 #TIL
- CSS
- textContent
- React
- 부트캠프
- 부트캠프 #개발일지 #TIL #FlexboxFroggy #displayflex #flexbox
- ㅜㄹㄹ
- 의사클래스
- 부트캠프 #코딩 #개발일지 #프론트엔드 #CSS #TIL
- Til
- 부트캠프 #개발일지 #TIL #CSS속성 #float #clear
- Today
- Total
나의 개발일지
[React] JSON과 비동기통신 실습 본문
JSON은 자바스크립트 강의 들을 때도 봤었고
특히 과제할 때 썼던 기억이 있어서 나름 들을만 했다
그리고 이제서야 뭔가 완벽하게 이해된 것 같아서 해소가 되었다
까먹지 않기 위해 바로바로 TIL 작성하기
JSON 이란
자비스크립트 객체 문법에 토대를 둔, 문자 기반의 데이터 교환 형식을 말한다
다양한 형태의 구조를 가질 수 있다
원시 자료형인 문자열, 숫자, 불리언을 가질 수 있고 중첩된 계층 구조 포함한다
하지만 객체는 아니다! 객체 구조를 가진 것일 뿐
JSON에서는 ( " " )만 허용된다 ( ' ' --> X )
JSON -> 문자열 형태 -> 서버-클라이언트 간 데이터 전송 시 사용한다
JSON은 본래의 모습으로는 전송이 되지 않는다
파싱(parsing) 과정이 필수
1. JS 객체를 JSON 형태로 전송
2. JSON 형태를 JS 객체 형태로 전송
● stringify()
자바스크립트 객체 ---> JSON 문자열 반환
console.log(JSON.stringify({ x: 5, y: 6 }));
// Expected output: "{"x":5,"y":6}"
// 객체와 구분법 : JSON은 key값에 ""로 감싸져있다


console.log(JSON.stringify([new Number(3), new String('false'), new Boolean(false)]));
// Expected output: "[3,"false",false]"
// 원시데이터 숫자, 문자열, 불리언 반환이 가능하다


console.log(JSON.stringify({ x: [10, undefined, function(){}, Symbol('')] }));
// Expected output: "{"x":[10,null,null,null]}"

console.log(JSON.stringify(new Date(2006, 0, 2, 15, 4, 5)));
// Expected output: ""2006-01-02T15:04:05.000Z""


let meetup = {
	title: "Conference",
	room:{
		number : 23,
		participants : ["john", "ann"]
	}
};

// Expected output:
alret(JSON.stringify(meetup));

"title" : "Conference",
"room":{"number":23, "participants" :["john", "ann"]}
}

//중첩 객체도 알아서 문자열로 바꿔준다
● parse()
JSON 문자열 ---> 자바스크립트 객체 반환
const json = '{"result":true, "count":42}';
const obj = JSON.parse(json);

// 원시데이터 숫자
console.log(obj.count);
// Expected output: 42


// 원시데이터 불리언
console.log(obj.result);
// Expected output: true
JSONPlaceholder (= fake server, mock API server)
: 가짜 서버 , API를 가져와서 test 해볼 수 있는 사이트이다
https://jsonplaceholder.typicode.com/guide/
JSONPlaceholder - Guide
Guide Below you'll find examples using Fetch API but you can JSONPlaceholder with any other language. You can copy paste the code in your browser console to quickly test JSONPlaceholder. Getting a resource fetch('https://jsonplaceholder.typicode.com/posts/
jsonplaceholder.typicode.com
https://jsonplaceholder.typicode.com/posts
이 링크를 들어가보면
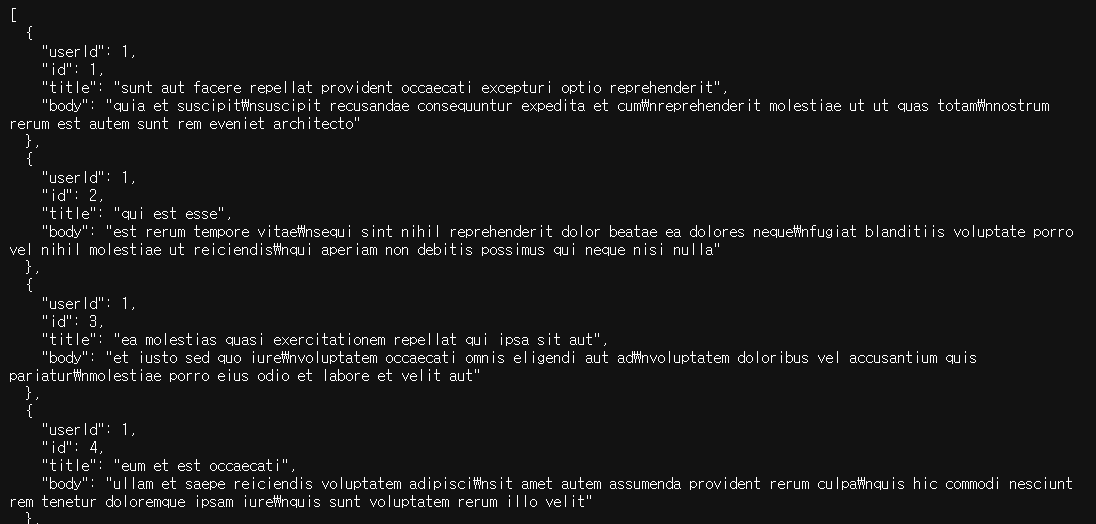
이런 배열 형태로 나와있는 걸 볼 수 있다
✔️ useEffect를 통해 렌더링 될 때 값들이 나타나게 한다
(** 의존성 배열 잊지 말기 )
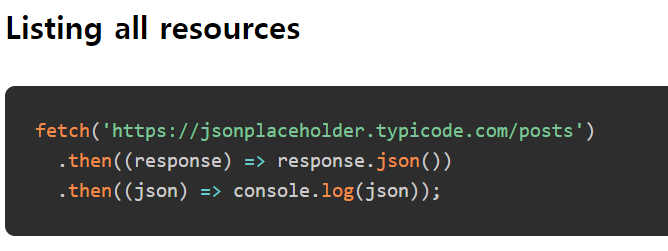
✔️ 밑의 코드를 그대로 복사하면 된다
fetch('https://jsonplaceholder.typicode.com/posts')
  .then((response) => response.json())
  .then((json) => console.log(json));
function App() {
  const [data, setData] = useState([]);

  useEffect(() => {
    fetch("https://jsonplaceholder.typicode.com/posts")
      .then((response) => response.json())
      .then((json) => {
        //컴포넌트 채워넣는 부분에 뿌려주기
        setData([...json]); // json이 원래 배열 형태였으니 [] 써주어야 한다
        return console.log(json);
      });
  }, []);
✔️컴포넌트 정보 받아오기
 return (
    <div>
      <h3>JSON Placeholer DATA</h3>
      {data.map((item) => {
        return (
          <div style={{ border: "1px solid black", margin: "3px" }}>
            <ul>
              <li>{item.userId}</li>
              <li>{item.id}</li>
              <li>{item.title}</li>
              <li>{item.body}</li>
            </ul>
          </div>
        );
      })}
    </div>
  );
}
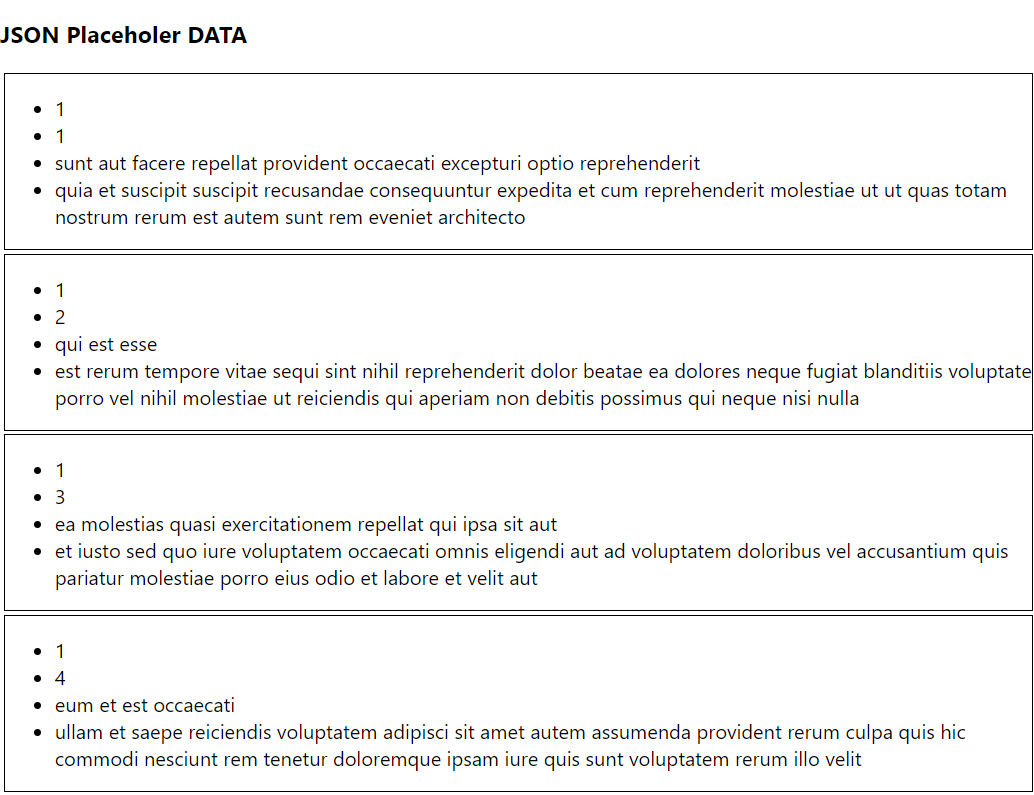
잘 받아와지는 걸 확인할 수 있다
아직 익숙치않아서 이 과정을 여러 번 반복해야 할 것 같다!

'React' 카테고리의 다른 글
| [React] React query로 TodoList 리팩토링하기 (0) | 2023.12.09 |
|---|---|
| [React] 에러 발생 및 해결 Cannot read properties of undefined (1) | 2023.11.23 |
| [React] React Hooks - useState / useEffect / useRef (0) | 2023.11.09 |
| [React] Styled Components - GlobalStyles (전역스타일링) / CSS RESET (0) | 2023.11.08 |
| [React] styled Components 사용하기 (0) | 2023.11.07 |


